
ALL-IN-ONE PLATFORM
esDynamic
Manage your attack workflows in a powerful and collaborative platform.
Expertise Modules
Executable catalog of attacks and techniques.
Infrastructure
Integrate your lab equipment and remotely manage your bench.
Lab equipments
Upgrade your lab with the latest hardware technologies.


PHYSICAL ATTACKS
Side Channel Attacks
Evaluate cryptography algorithms from data acquitition to result visualisation.
Fault Injection Attacks
Laser, Electromagnetic or Glitch to exploit a physical disruption.
Photoemission Analysis
Detect photon emissions from your IC to observe its behavior during operation.


EXPERTISE SERVICES
Evaluation Lab
Our team is ready to provide expert analysis of your hardware.
Starter Kits
Build know-how via built-in use cases developed on modern chips.
Cybersecurity Training
Grow expertise with hands-on training modules guided by a coach.


ALL-IN-ONE PLATFORM
esReverse
Static, dynamic and stress testing in a powerful and collaborative platform.
Extension: Intel x86, x64
Dynamic analyses for x86/x64 binaries with dedicated emulation frameworks.
Extension: ARM 32, 64
Dynamic analyses for ARM binaries with dedicated emulation frameworks.
DIFFERENT USAGES
Penetration Testing
Identify and exploit system vulnerabilities in a single platform.
Vulnerability Research
Uncover and address security gaps faster and more efficiently.
Code Audit & Verification
Effectively detect and neutralise harmful software.
Digital Forensics
Collaboratively analyse data to ensure thorough investigation.


EXPERTISE SERVICES
Software Assessment
Our team is ready to provide expert analysis of your binary code.
Cybersecurity training
Grow expertise with hands-on training modules guided by a coach.

INDUSTRIES
Semiconductor
Automotive
Security Lab
Gov. Agencies
Academics
Defense
Healthcare
Energy

ABOUT US
Why eShard?
Our team
Careers


FOLLOW US
Linkedin
Twitter
Youtube
Gitlab
Github


Time Travel Analysis with QEMU on IoT Targets: Not Always That Hard - Part I


When analyzing a CVE, it can be useful to leverage Time Travel Analysis (TTA) with esReverse. But before we can dive into a TTA trace, there’s one key step: we need to run the code and capture its execution.
To do that, we often turn to code emulation.
But what if the target is an IoT device?
When it comes to firmware emulation in IoT devices, we often face unknown peripherals or missing proprietary code. In such cases, it might seem more appropriate to emulate only a small portion of the firmware: this is why tools like Unicorn/Qiling become attractive. In fact, we have previously demonstrated how to use Qiling for TTA in this article.
 Overview of the time travel debugging tool in esReverse
Even with Qiling, emulation can be tedious or incomplete depending on the context. That’s where QEMU comes into play, offering many advantages:
- More complete system emulation
- Increasing support for IoT boards
- Native GDB support
- A large community and frequent updates
However, many boards are still only partially supported or not supported at all in QEMU. Also, it's much more harder to adapt a board than with Qiling. The immediate conclusion might be to abandon the idea of using QEMU for TTA… but what if that assumption is wrong?
In this series of blog posts, we’ll demonstrate how to emulate firmware for boards even with partial QEMU support, with the goal of performing TTA on them.
To illustrate this, we’ll focus today on CVE-2019-14192, a buffer overflow vulnerability in the U-Boot bootloader, which can be triggered through interaction with an NFS server. We'll see that U-Boot supports many targets, including one designed for QEMU emulation!
As a result, Qemu emulation becomes very straightforward, making TTA trace generation equally seamless. We will:
- compile U-Boot for the QEMU AArch64 target
- describe the CVE
- reproduce it on the emulated system
- and finally, show how to capture and analyze a TTA trace from that setup.
What is U-Boot?
![]()
U-Boot (Das U-Boot) is an open-source bootloader commonly used in embedded Linux systems. It is responsible for initializing the hardware after power-on, loading the operating system kernel (such as Linux), and passing control to it.
U-Boot supports a wide range of architectures (ARM, x86, MIPS, RISC-V, etc.) and includes features like network booting (TFTP, NFS), flash memory access, and scripting for automation.
CVE-2019-14192
U-Boot is impacted by a vulnerability identified as CVE-2019-14192. The NIST website describes it as follows:
An issue was discovered in Das U-Boot through 2019.07. There is an unbounded memcpy when parsing a UDP packet due to a net_process_received_packet integer underflow during an nc_input_packet call.
On this Github, the researchers who discovered the CVE, Fermin J. Serna and Pavel Avgustinov, provide further details. Among other things, they explain that the flaw can be exploited when U-Boot communicates with an NFS server.
An NFS server lets other machines access its files over the network as if they were local. Loading the kernel from a remote NFS server in U-Boot is useful for development and testing. It avoids the need to flash the kernel to local storage after every change. Instead, you can simply update the kernel file on the server, and U-Boot can load it over the network.
The flaw can be triggered when U-Boot attempts to access a file via a symbolic link. Fermin J. Serna explains that the function nfs_readlink_reply, which processes the NFS server's response, uses an unsafe memcpy call. The server's reply includes the target filename of the symlink:
- it first specifies the length of the filename string (4 bytes),
- followed by the filename itself.
This filename is then copied into a global buffer called nfs_path, which is a 2048-byte array. However, since the copy is done using an unbounded memcpy, a specially crafted response with a large filename can cause a buffer overflow.
Below is a code snippet of the nfs_readlink_reply function, taken from an affected version of U-Boot on github.
// /net/nfs.c:nfs_readlink_reply:L608
static int nfs_readlink_reply(uchar *pkt, unsigned len)
{
	[...]

	/* new path length */
	rlen = ntohl(rpc_pkt.u.reply.data[1 + nfsv3_data_offset]);

	if (*((char *)&(rpc_pkt.u.reply.data[2 + nfsv3_data_offset])) != '/') {
		int pathlen;

		strcat(nfs_path, "/");
		pathlen = strlen(nfs_path);
		memcpy(nfs_path + pathlen,
		       (uchar *)&(rpc_pkt.u.reply.data[2 + nfsv3_data_offset]),
		       rlen);
		nfs_path[pathlen + rlen] = 0;
	} else {
		memcpy(nfs_path,
		       (uchar *)&(rpc_pkt.u.reply.data[2 + nfsv3_data_offset]),
		       rlen);
		nfs_path[rlen] = 0;
	}
	return 0;
}
In the end, we have U-Boot, which can be compiled for a QEMU-compatible target, enabling straightforward emulation. On top of that, the CVE in question is not tied to any specific hardware driver. This makes QEMU-based Time Travel Analysis both feasible and relevant for understanding the vulnerability. Let’s do it!
Setting up the test environment
To analyze this CVE, we first need to set up a test environment. This involves:
- Downloading the affected U-Boot version 2019.07
- Compiling it for a QEMU AArch64 target.
- Next, we must create a minimal NFS server.
- Ultimately, we emulate U-Boot and configure it to access a file specified by a symbolic link triggering the vulnerable nfs_readlink_reply function.
U-Boot 2019.07 compilation
Let’s compile U-Boot!
We download the vulnerable U-Boot version 2019.07.
git clone --branch v2019.07 https://gitlab.com/u-boot/u-boot
Next, we need to cross-compile it. Since we are using a Linux x86_64 workstation, we can use, for example, an AArch64 toolchain provided by Linaro.
Once we have extracted the archive, we need to set several environment variables:
- CROSS_COMPILE=aarch64-linux-gnu- tells the build system to use the AArch64 cross-compiler tools
- ARCH=arm64 specifies the target architecture as 64-bit ARM.
export PATH=$PATH:/usr/share/toolchain/gcc-linaro-6.4.1-2017.11-x86_64_aarch64-linux-gnu/bin
export CROSS_COMPILE=aarch64-linux-gnu-
export ARCH=arm64
As mentioned earlier, U-Boot supports many different architectures. The complete list can be found in the u-boot/configs directory. We use the make command to specify the target architecture and start the compilation process.
cd u-boot

make qemu_arm64_defconfig
make
Since we are compiling an old version of U-Boot with a newer toolchain, the final make command may produce an error. Explaining the root cause of this error is beyond the scope of this blog post, so we’ll simply provide a quick fix. We need to patch the file ./u-boot/scripts/dtc/dtc-lexer.lex.c by replacing the line YYLTYPE yylloc; with extern YYLTYPE yylloc;.
sed -i -e 's/^YYLTYPE yylloc;/extern YYLTYPE yylloc;/g' ./u-boot/scripts/dtc/dtc-lexer.lex.c
Next, we run the make command again, and the compilation completes successfully!
make
The most notable files generated are:
- u-boot: the final ELF executable with debug information.
- u-boot.bin: the raw binary image.
NFS Server
We won’t go into detail about setting up an NFS server on a Linux machine, but here are a few key tips. First, the flaw is triggered by a UDP packet, yet NFS servers often disable UDP by default. So, we check this relevant setting in the /etc/nfs.conf file.
# /etc/nfs.conf
[nfsd]
# set to true because u-boot use only udp
udp=y
In our setup, we created a NFS share at /srv/nfs which contains the following files:
- A regular file named test_file.txt
- A symbolic link named sym_link_to_test_file.txt that points to test_file.txt
lrwxrwxrwx 1 azerty  users     15 11 juin  11:48 sym_link_to_test_file.txt -> ./test_file.txt
-rw-r--r-- 1 azerty  users   16 11 juin  11:46 test_file.txt
Then, we must update the /etc/exports file. It is used to configure which directories a Linux system shares over NFS. It defines the shared folders, which client machines can access them, and with what permissions. So, we must add a line to make /srv/nfs accessible.
# /etc/exports
/srv/nfs 127.0.0.1(rw,sync,no_subtree_check,no_root_squash,insecure)
Then, we must apply the changes made to this file.
sudo exportfs -av
Lastly, we ensure the NFS server is running.
sudo systemctl restart nfs-server.service
Perfect, it’s time to run U-Boot!
U-boot emulation with qemu-system
We're now ready to launch U-Boot with QEMU. Since U-Boot was compiled for this specific target, all necessary hardware will be properly emulated. We just need to run QEMU with the appropriate parameters.
qemu-system-aarch64 \
    -M virt \
    -cpu cortex-a57 \
    -smp 1 \
    -m 512M \
    -nographic \
    -bios ./u-boot.bin \
    -netdev user,id=net0 \
    -device virtio-net-device,netdev=net0 \
    -no-reboot
Let’s explain the different parameters:
- qemu-system-aarch64: we run QEMU to emulate a 64-bit ARM architecture (AArch64).
- -M virt: we use the generic “virt” virtual board.
- -cpu cortex-a57: we emulate a Cortex-A57 CPU core (a 64-bit ARM core).
- -smp 1: we set one core to the CPU.
- -m 512M: we allocate 512 MB of RAM for the virtual machine.
- -nographic: we disable the graphical display; all input/output goes through the terminal (serial console).
- -bios ./u-boot.bin: we load the compiled U-Boot firmware binary.
- -netdev user,id=net0: we create a user-mode network backend with ID “net0” (enables basic NAT networking).
- -device virtio-net-device,netdev=net0: we add a virtio network device to the emulated system.
- -no-reboot: we prevent QEMU from automatically rebooting when the guest system shuts down or crashes.
U-Boot has launched successfully: we enter the shell, where it awaits commands.
U-Boot 2019.07-dirty (Apr 23 2025 - 14:53:43 +0200)

DRAM:  512 MiB
Flash: 128 MiB
*** Warning - bad CRC, using default environment

In:    pl011@9000000
Out:   pl011@9000000
Err:   pl011@9000000
Net:
Warning: virtio-net#31 using MAC address from ROM
eth0: virtio-net#31
Hit any key to stop autoboot:  0
starting USB...
No working controllers found
USB is stopped. Please issue 'usb start' first.
scanning bus for devices...

Device 0: unknown device

Device 0: unknown device
starting USB...
No working controllers found
BOOTP broadcast 1
DHCP client bound to address 10.0.2.15 (1 ms)
Using virtio-net#31 device
TFTP from server 10.0.2.2; our IP address is 10.0.2.15
Filename 'boot.scr.uimg'.
Load address: 0x40200000
Loading: *
TFTP error: 'Access violation' (2)
Not retrying...
BOOTP broadcast 1
DHCP client bound to address 10.0.2.15 (0 ms)
Using virtio-net#31 device
TFTP from server 10.0.2.2; our IP address is 10.0.2.15
Filename 'boot.scr.uimg'.
Load address: 0x40400000
Loading: *
TFTP error: 'Access violation' (2)
Not retrying...
=>
However, by default, it is not configured to access an NFS server. Configuring NFS access involves three steps:
- Setting U-Boot’s IP address
- Setting the NFS server’s IP address
- Defining the NFS server’s root directory
In our setup, networking is emulated using SLIRP user mode. According to the QEMU networking documentation, this means that U-Boot (the guest) is assigned the IP address 10.0.2.15, while the host (acting as the server) uses 10.0.2.2
=> setenv ipaddr 10.0.2.15
=> setenv serverip 10.0.2.2
=> setenv nfsroot /srv/nfs
Finally, we will read the file sym_link_to_test_file.txt from the NFS server (which is defined as a symbolic link) and copy its content to the address 0x40000000.
=> nfs 0x40000000 ${serverip}:${nfsroot}/sym_link_to_test_file.txt
The result is as follow:
Using virtio-net#31 device
File transfer via NFS from server 10.0.2.2; our IP address is 10.0.2.15
Filename '/srv/nfs/sym_link_to_test_file.txt'.
Load address: 0x40000000
Loading: #
done
Bytes transferred = 16 (10 hex)
Great, the setup is functional, now let’s look at how to trigger the flaw.
Communication analysis
First, let's take a look at the NFS communication that occurs when reading this file. We can monitor the communication between U-Boot and the host by running tcpdump on the host machine. We focus on three ports:
- Port 2049, used by the nfs.d service, which handles the actual NFS file transfers.
- Port 20048, used by rpc.mountd, which authorizes and manages NFS mount requests.
- Port 111, used by the RPCbind service, which helps clients locate RPC services, including NFS.
We also instruct tcpdump to save the captured packets to capture.pcap file, allowing us to analyze the traffic later with Wireshark.
To do this, we run the following command:
sudo tcpdump -i any port 2049 or port 20048 or port 111 -X -w capture.pcap
Then, we simply rerun the previous file read of sym_link_to_test_file.txt in U-Boot and then stop tcpdump.
Now, we can analyze the captured traffic using Wireshark.
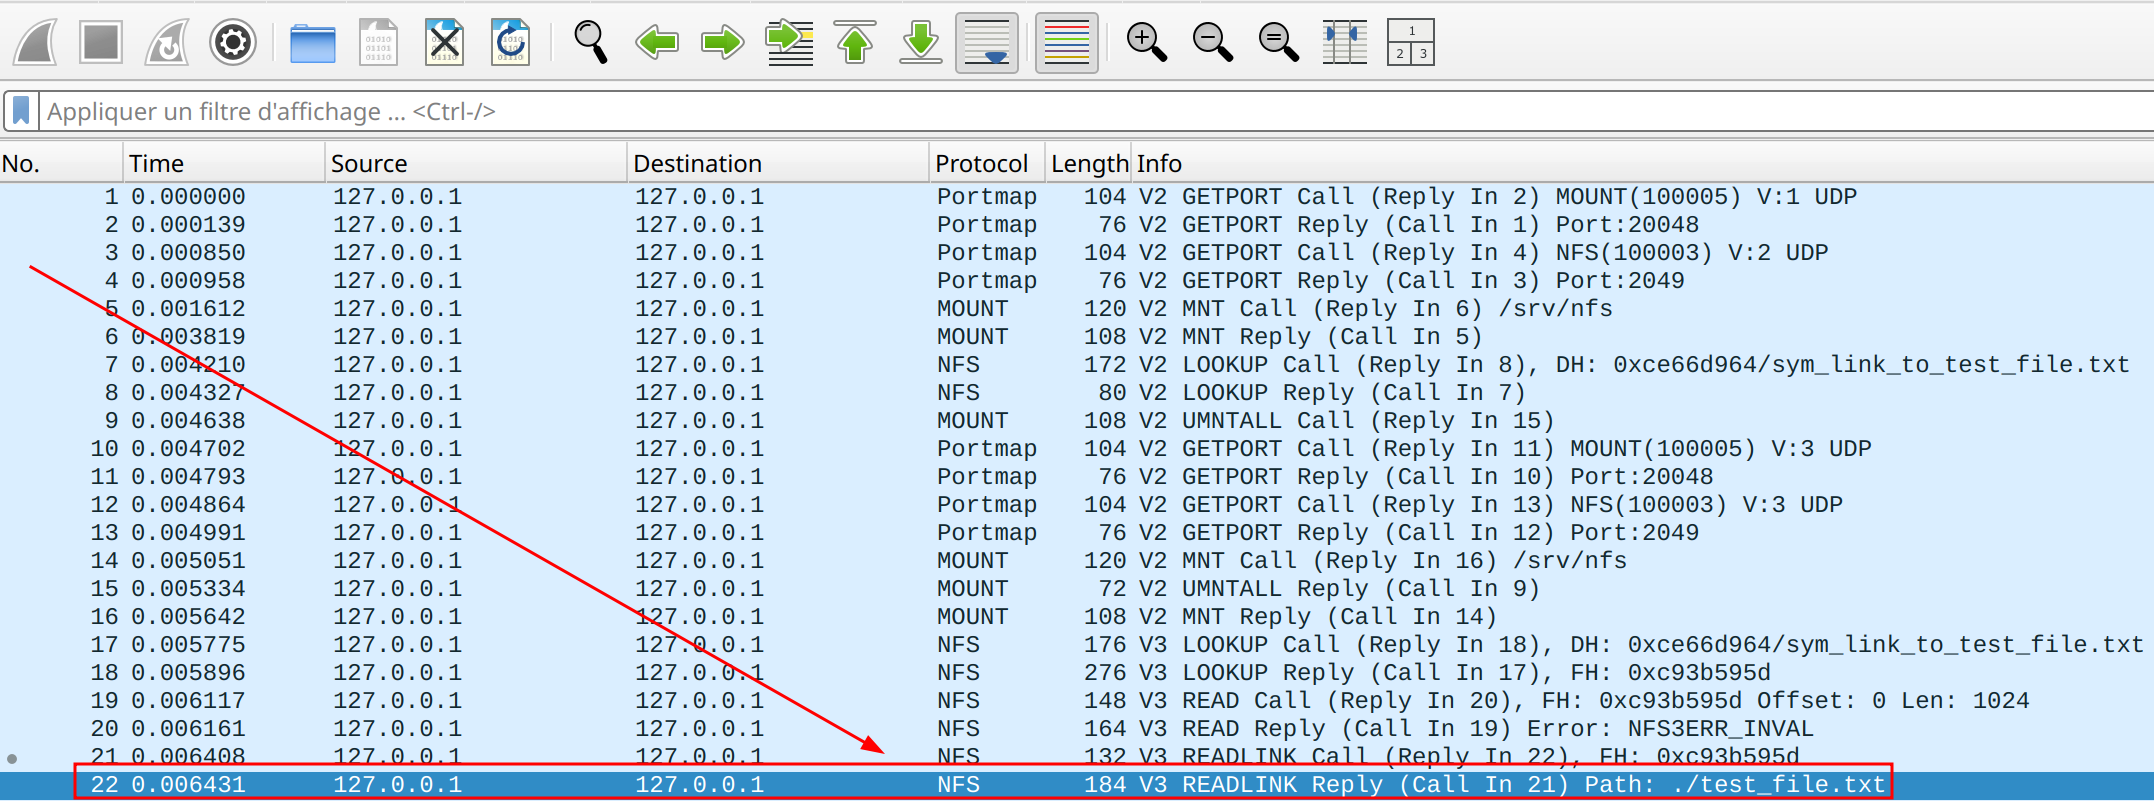
The readlink command is found on line 21, with the response to this request on line 22. The NFS server replies that the file sym_link_to_test_file.txt is a symbolic link pointing to the file test_file.txt.

Zooming in on this last request, highlighted in red, we can see the structure containing the filename:
- A 4-byte MSB length encoding the filename length: 0xf (15) bytes
- Followed by the string ./test_file.txt
By setting an excessively large length value, it is possible to trigger a buffer overflow.
Generating a TTA trace during Buffer Overflow exploitation
To trigger the buffer overflow, we could use a file with a very large length value. However, file name length limit and character restrictions may prevent us from fully exploiting the buffer overflow as intended.
However, we can quickly create a simple Python-based NFS server that, while basic, is sufficient to trigger the buffer overflow.
We have everything needed to trigger the buffer overflow. Since the buffer size is 2048 (0x800), as discussed earlier, any input exceeding this limit causes an overflow. So, we run the Python server and modify the size of the file, for example by setting it to 0x900, and set the filename to “AA…AA”.
Great, now all that’s left is to generate a TTA trace.
It is straightforward, we just need to add a few options to QEMU:
- “-plugin /reven/lib/eshard-qemu-plugin-tracer.so,output-dir=./trace -d plugin”.
Essentially, this tells QEMU to use the plugin for TTA trace generation, and the output-dir specifies the directory where the trace will be saved.
After launching QEMU with these additional options, we start the Python server and trigger the NFS communication to generate the TTA trace.
Regarding the generated trace:
- It is produced within a few minutes,
- It contains approximately 40 million traced instructions,
- Its size is roughly 2.5 GB.
The number of instructions may understandably seem very high. This can be explained by several factors:
- We trace everything from the very beginning of the U-Boot loading process.
- When reaching the U-Boot shell, the dispatcher continuously checks if the user has pressed any key. This causes extensive code execution, which in turn generates a large volume of traced instructions.
We can reduce the trace size by specifying the instruction number from which we want to start tracing (and also by scripting the execution of QEMU and sending data over UART).
TTA trace display
All that's left is to load and analyze our trace to ensure it was generated correctly.
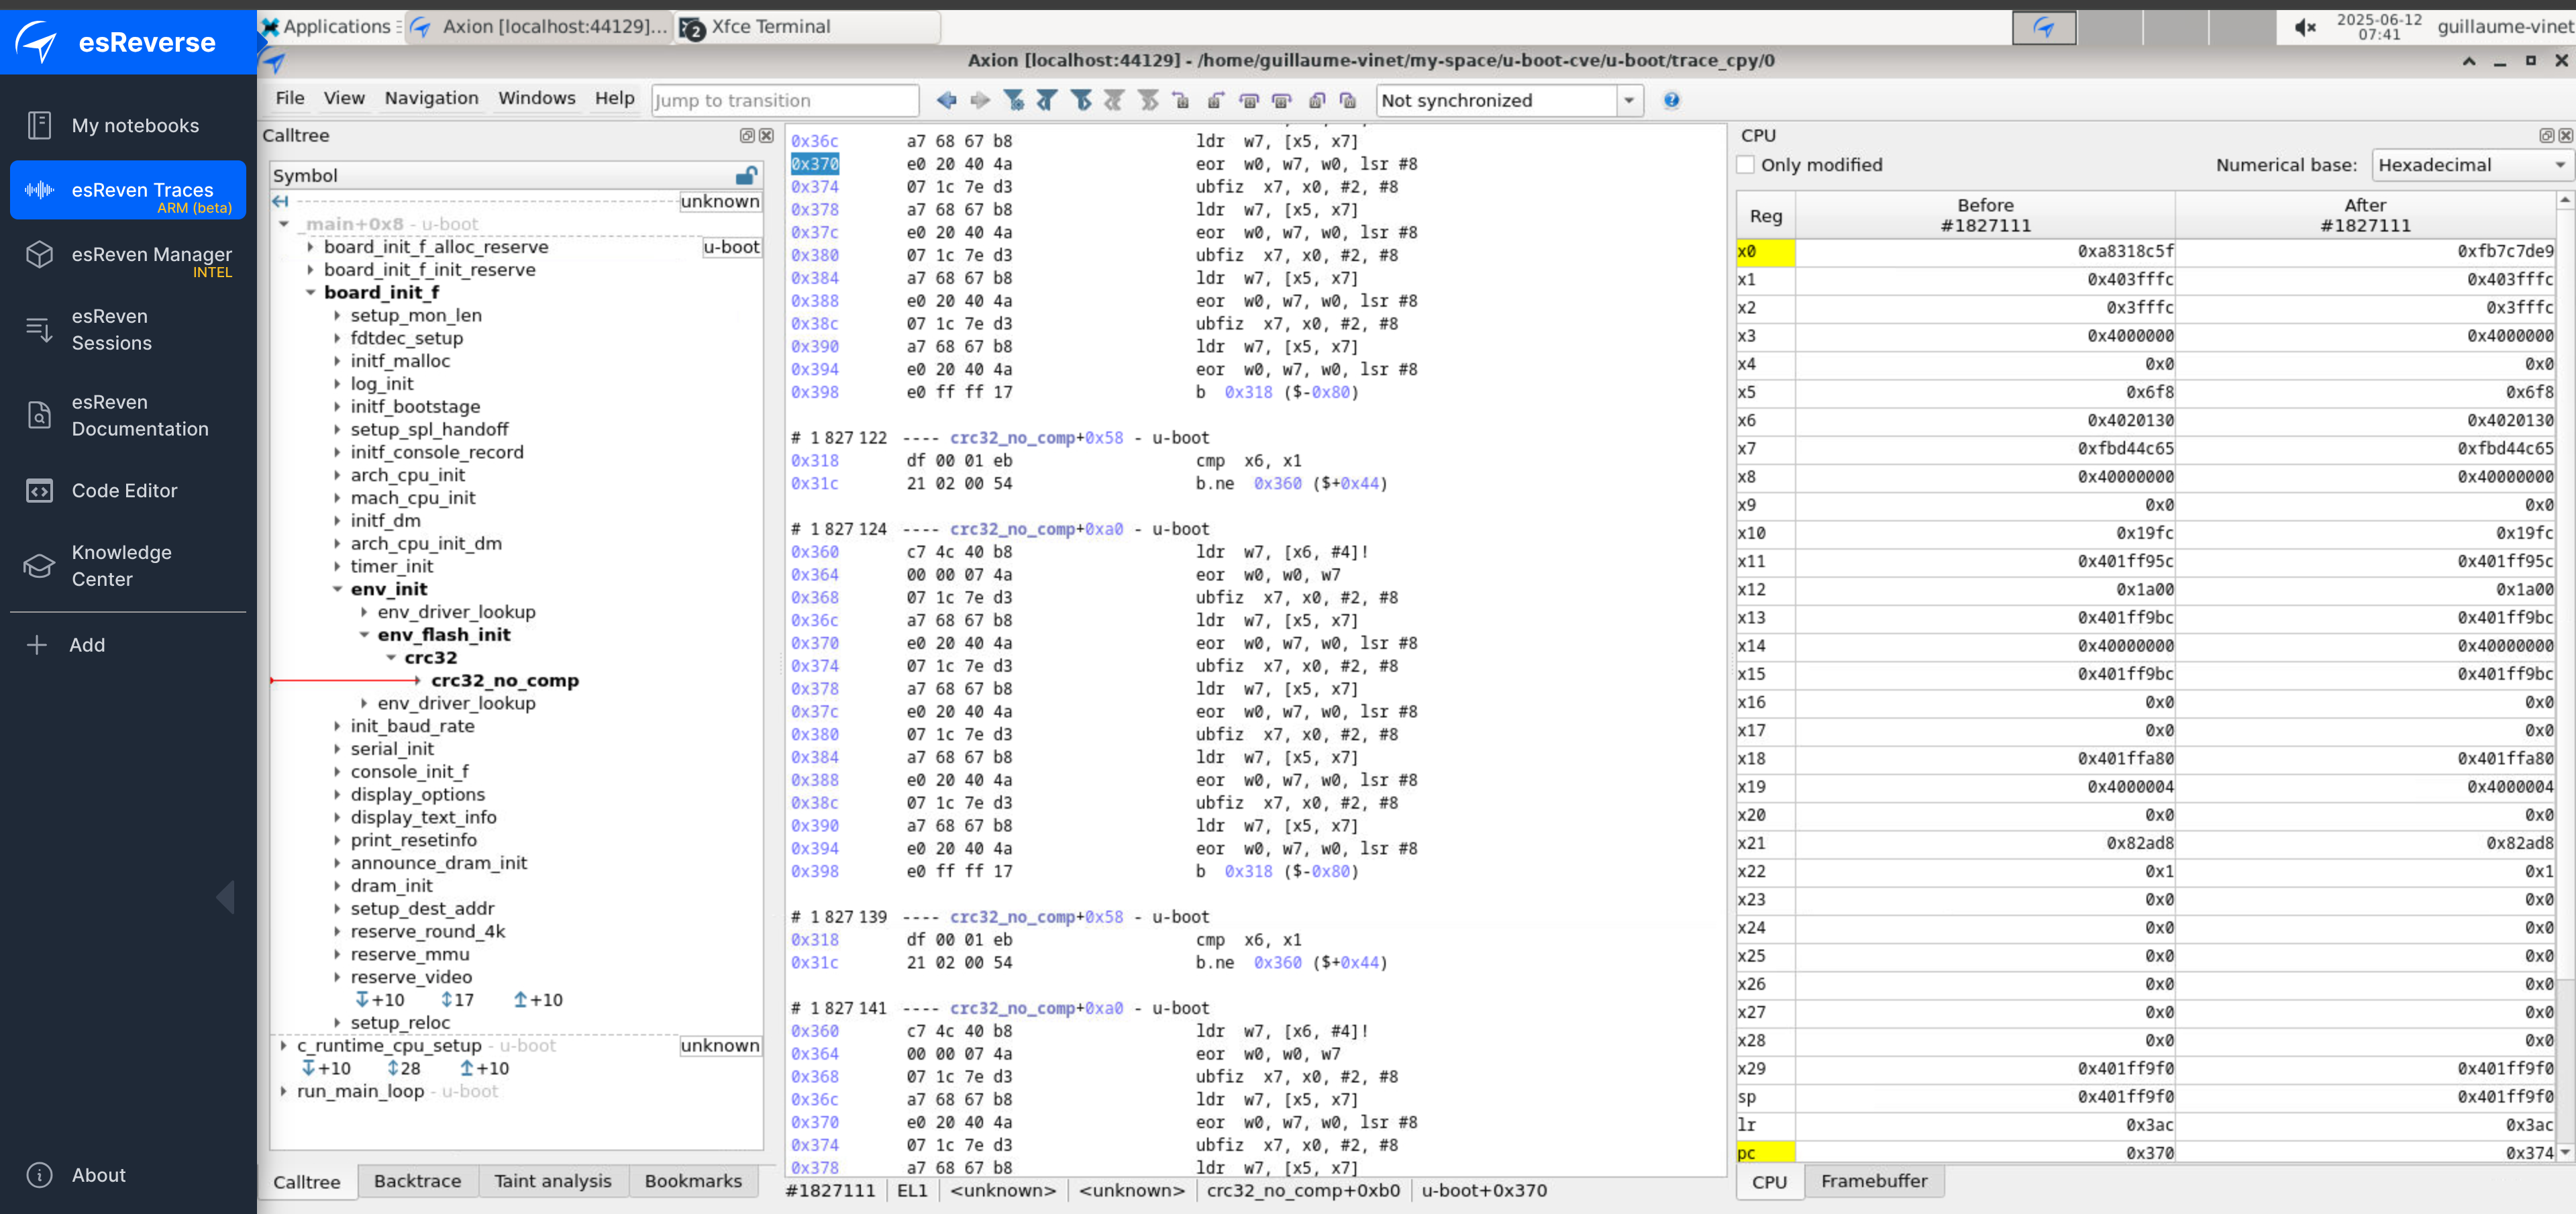
Since we have the u-boot.elf file with debug symbols, we can use it to display function names and improve trace readability. We load this file at address 0, and we can confirm that the call tree now properly displays function names.
However, if we navigate further through the trace, symbols are no longer resolved… Why is that?
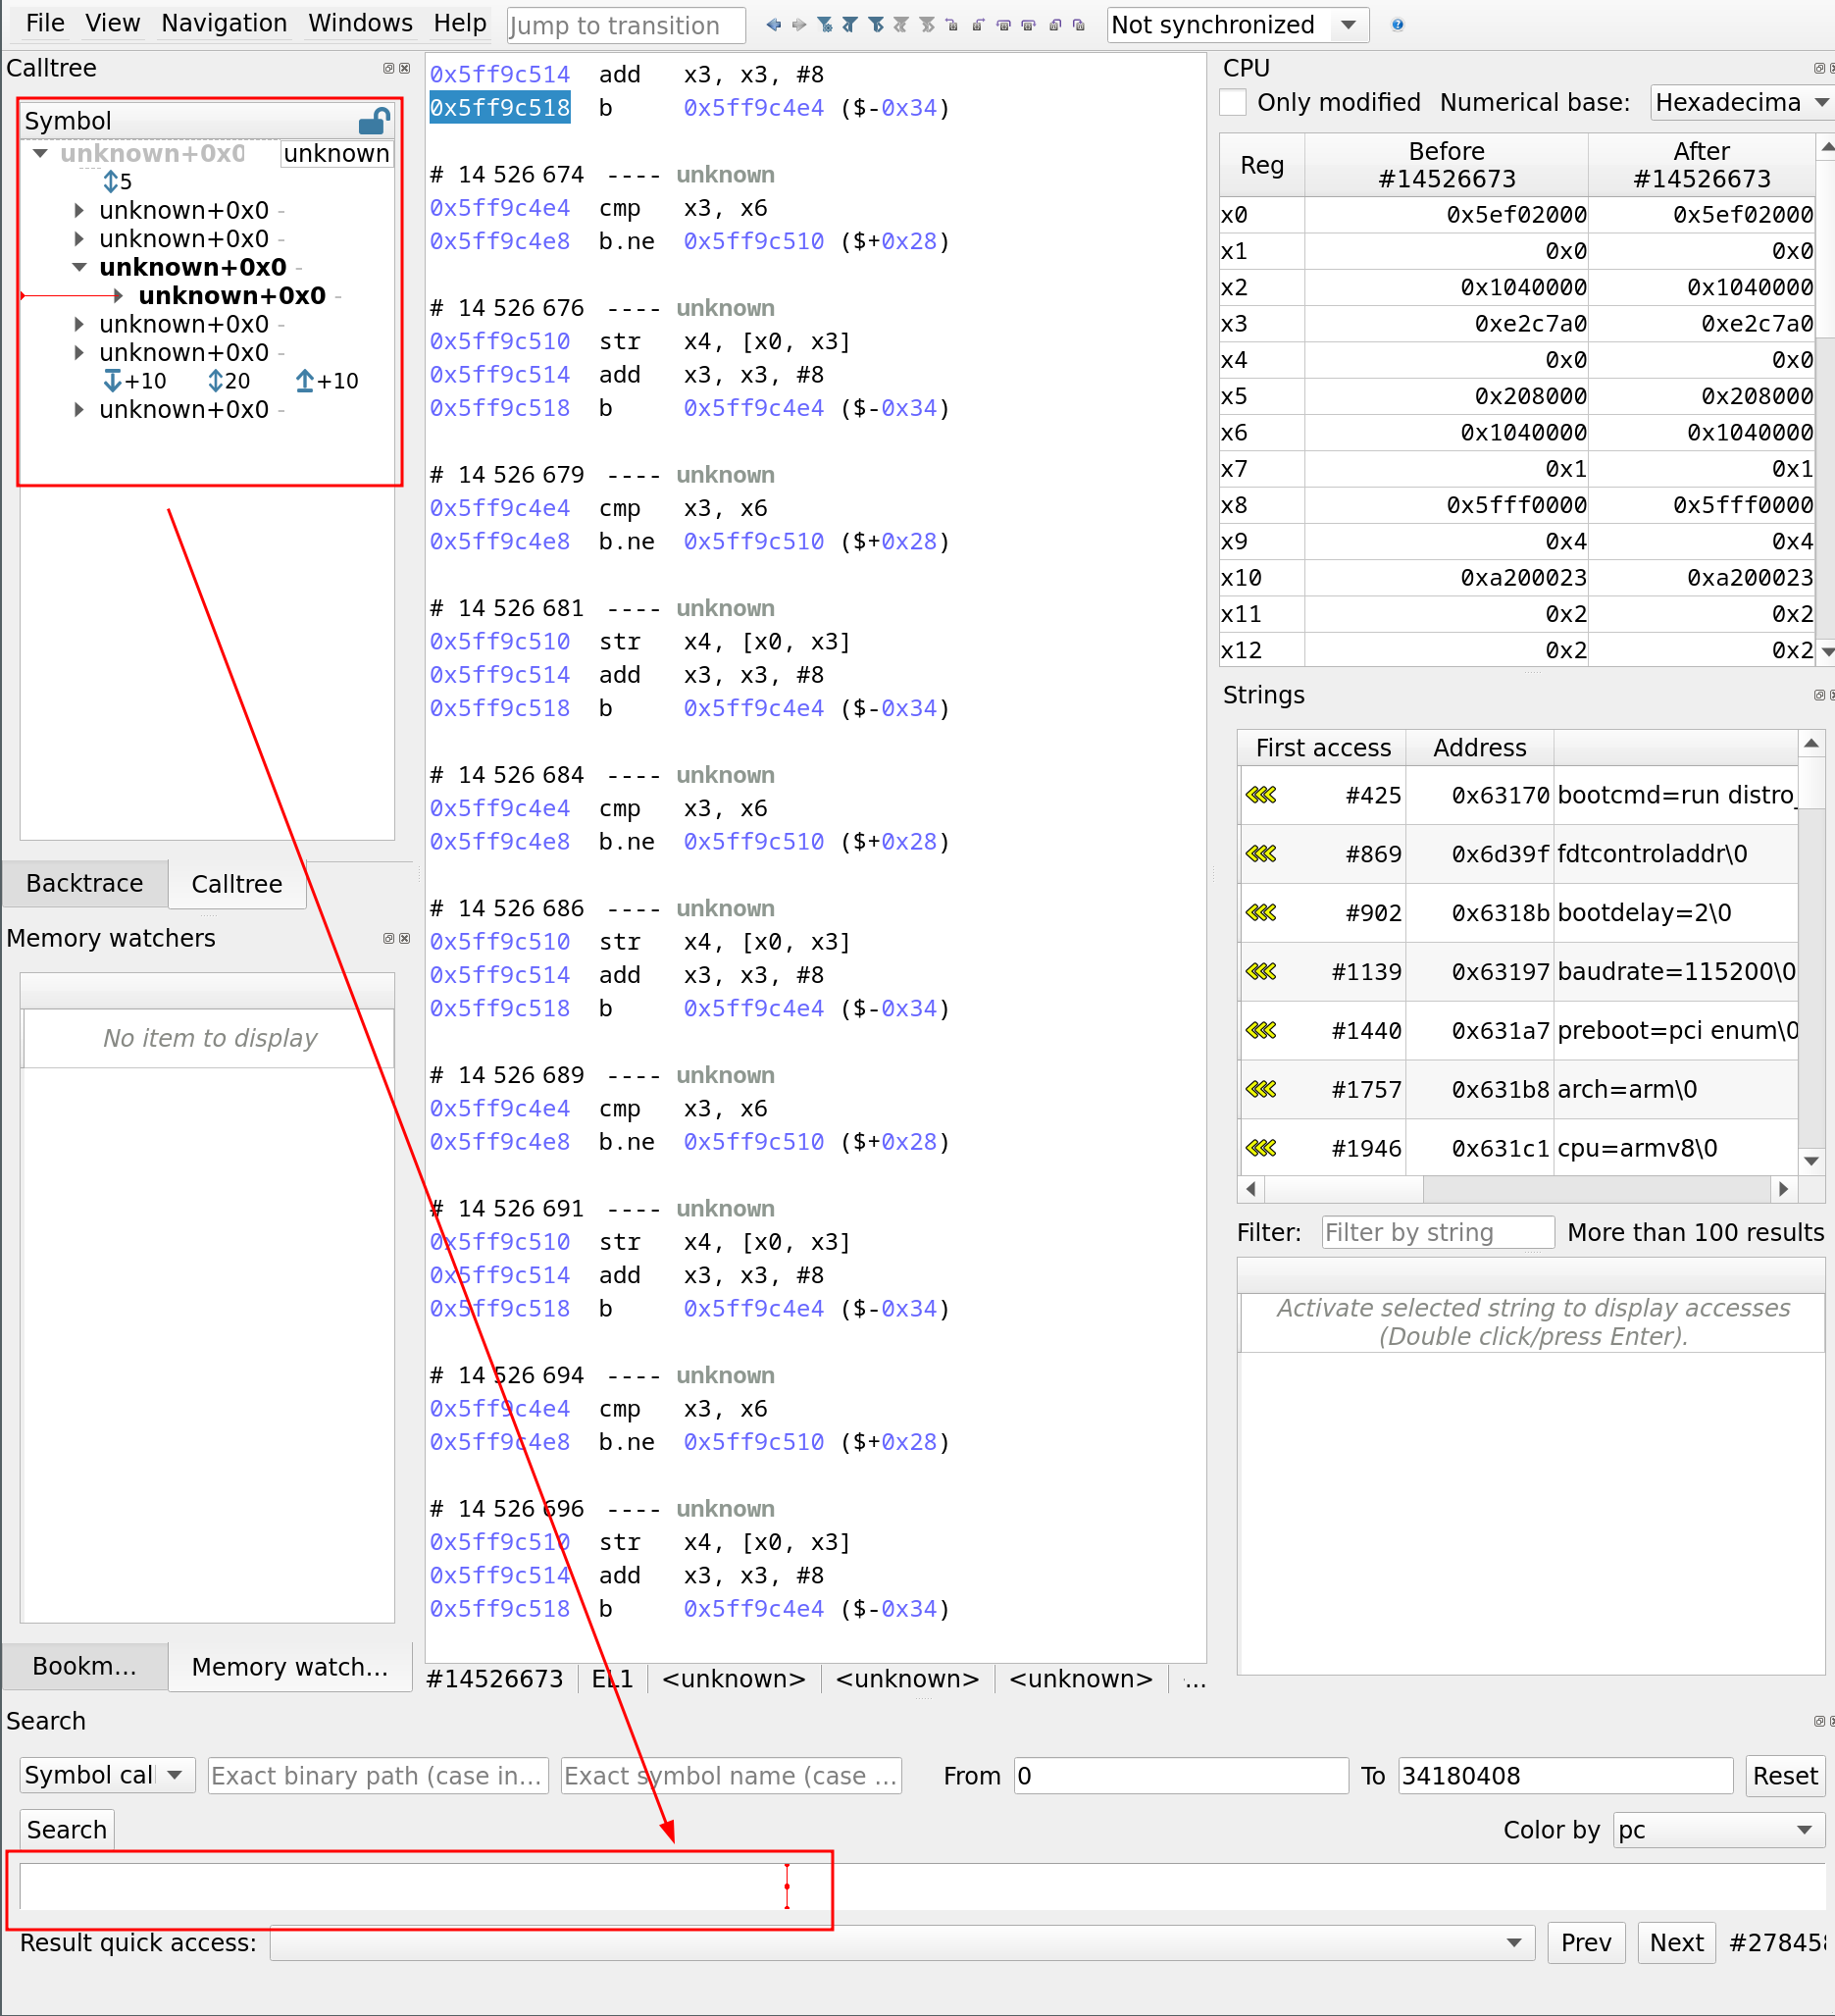
In simple terms, U-Boot initially starts executing in a very limited memory region, often read-only. To overcome this, it copies itself into a larger and faster writable RAM area. This relocation allows U-Boot to execute from a more suitable memory space.
This process is handled by the relocate_code function, whose first parameter (in register x0) indicates the new base address where the code is moved. To correctly display symbols in our trace analysis tool, we just need to map u-boot.elf at this relocated base address. Here’s how we retrieve it (In the next paragraph, we will use the GUI to perform our analysis, but of course, the entire sequence can be automated using a Python scrip):
- We use the search bar to locate the relocate_code function
- We click on the result to display the function
- Ultimately, we read the value of x0: the new base address is 0x5FF42000
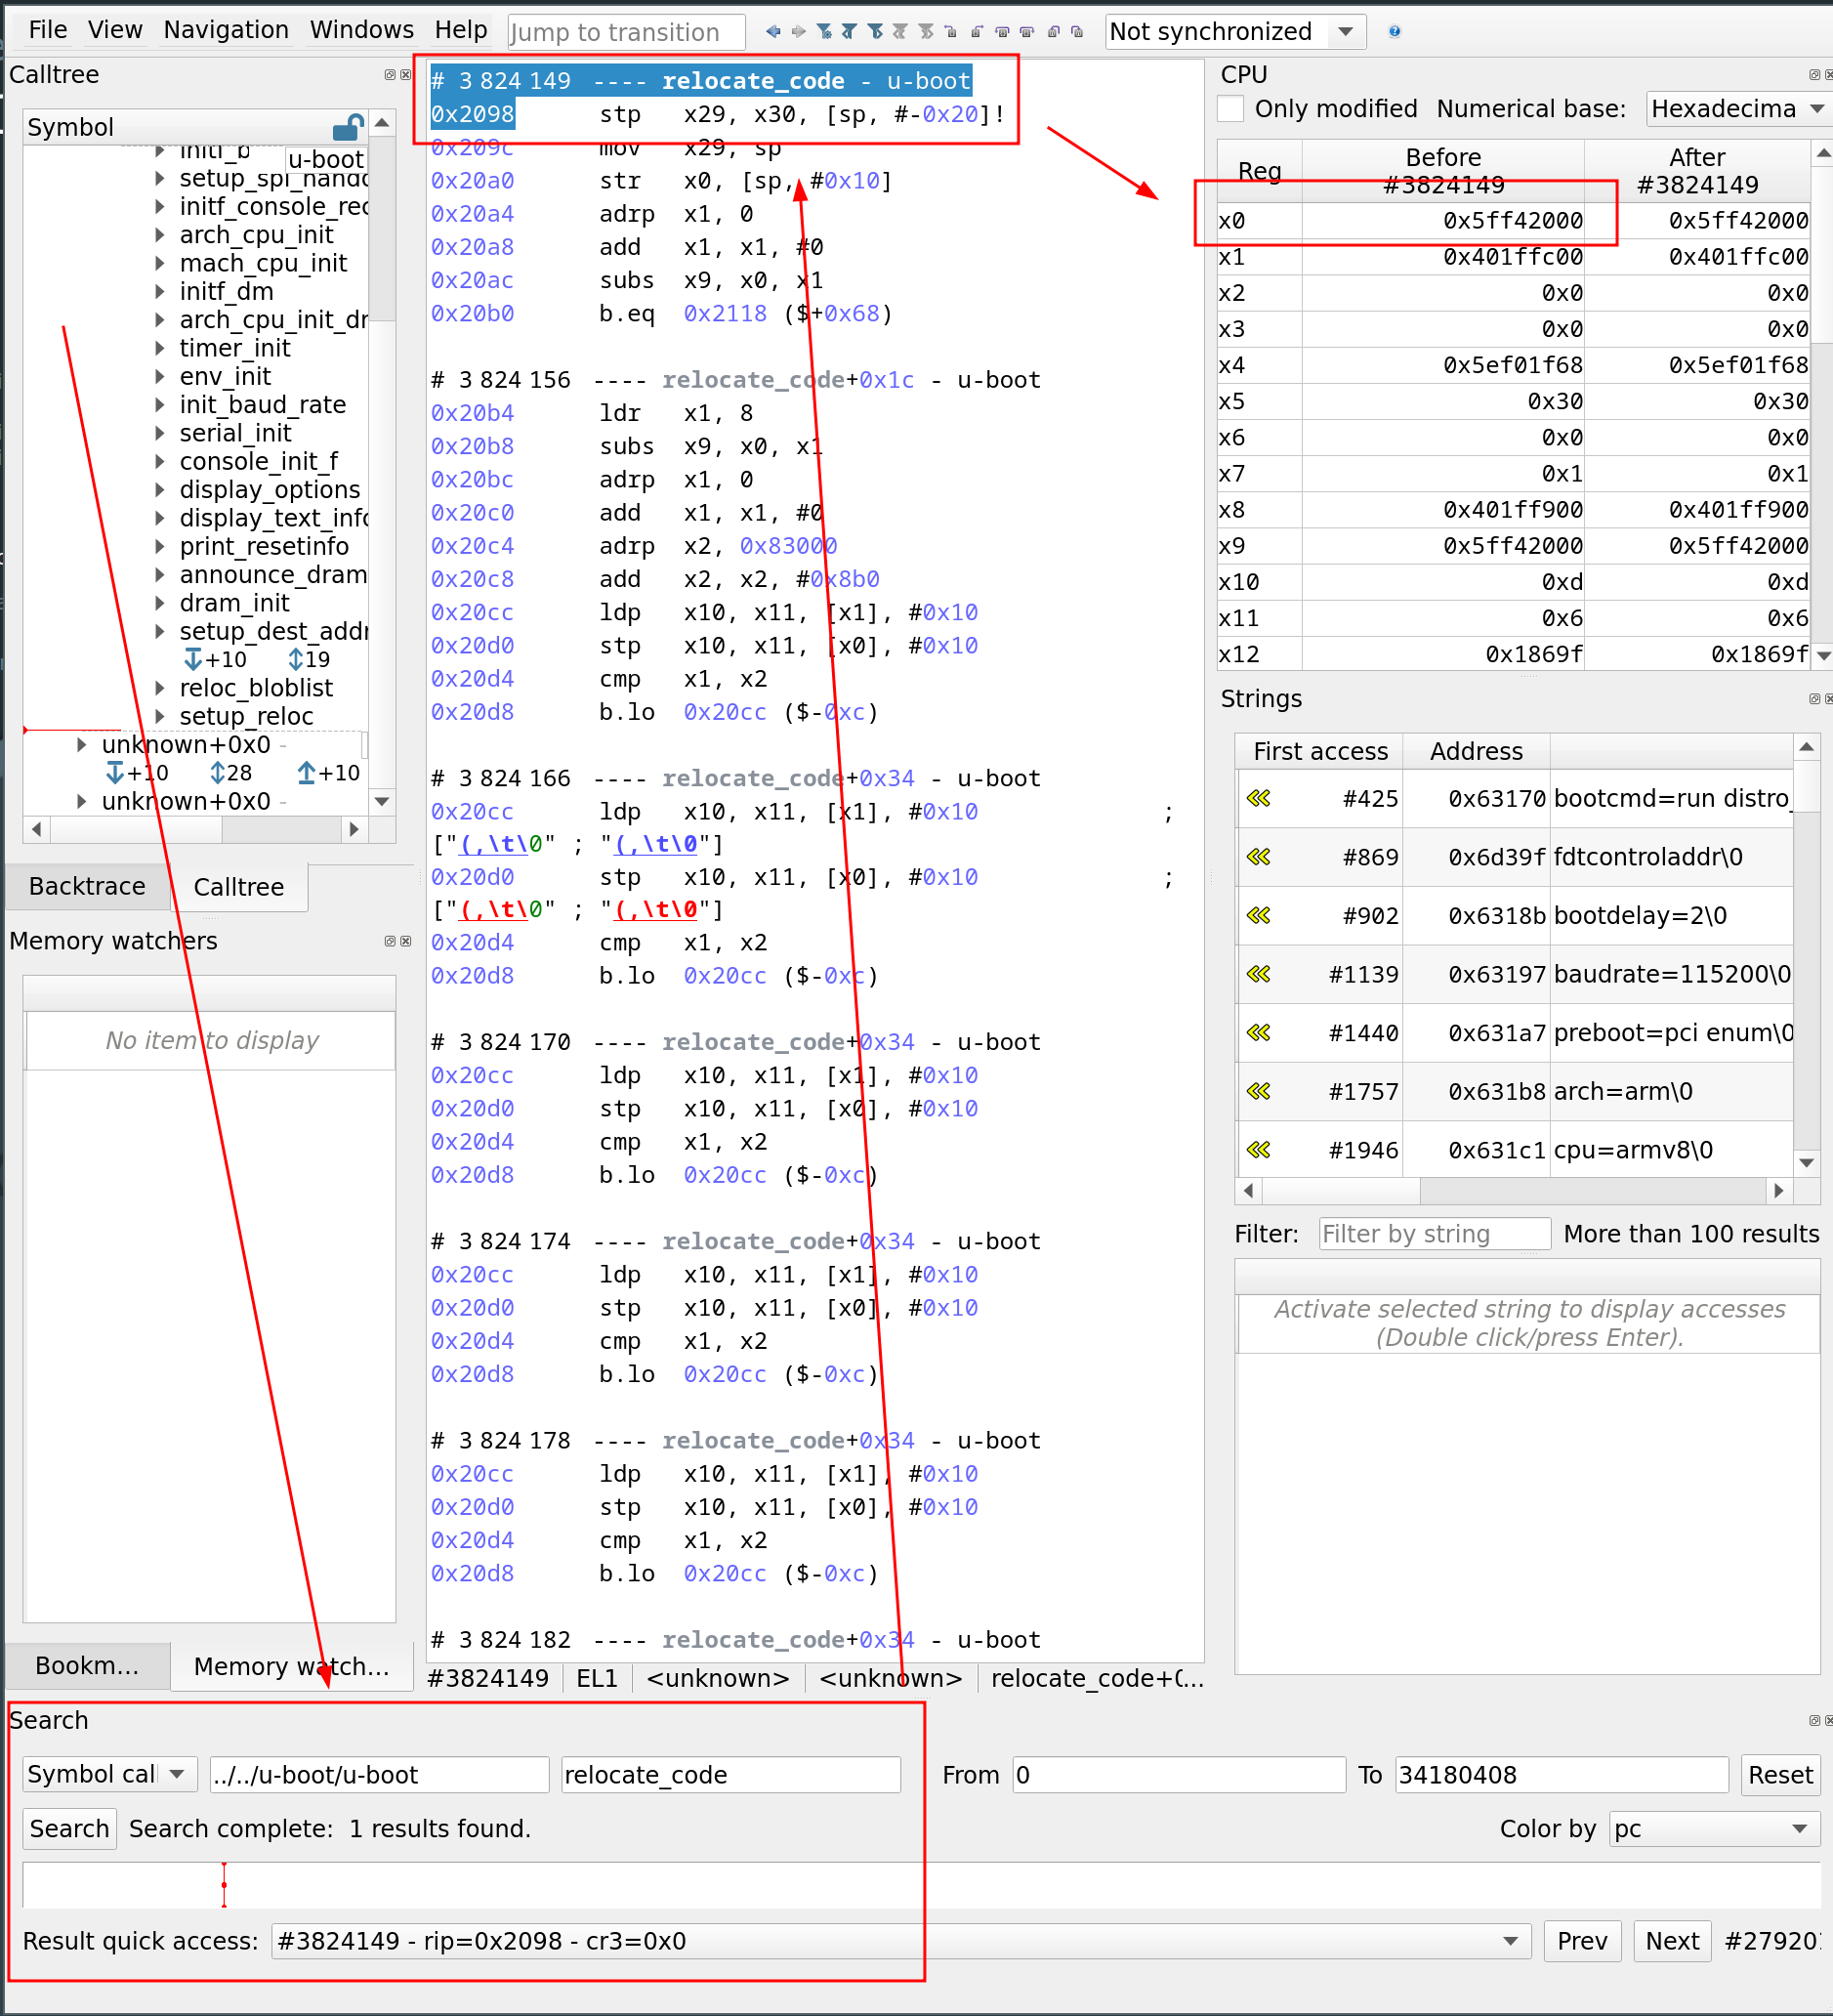
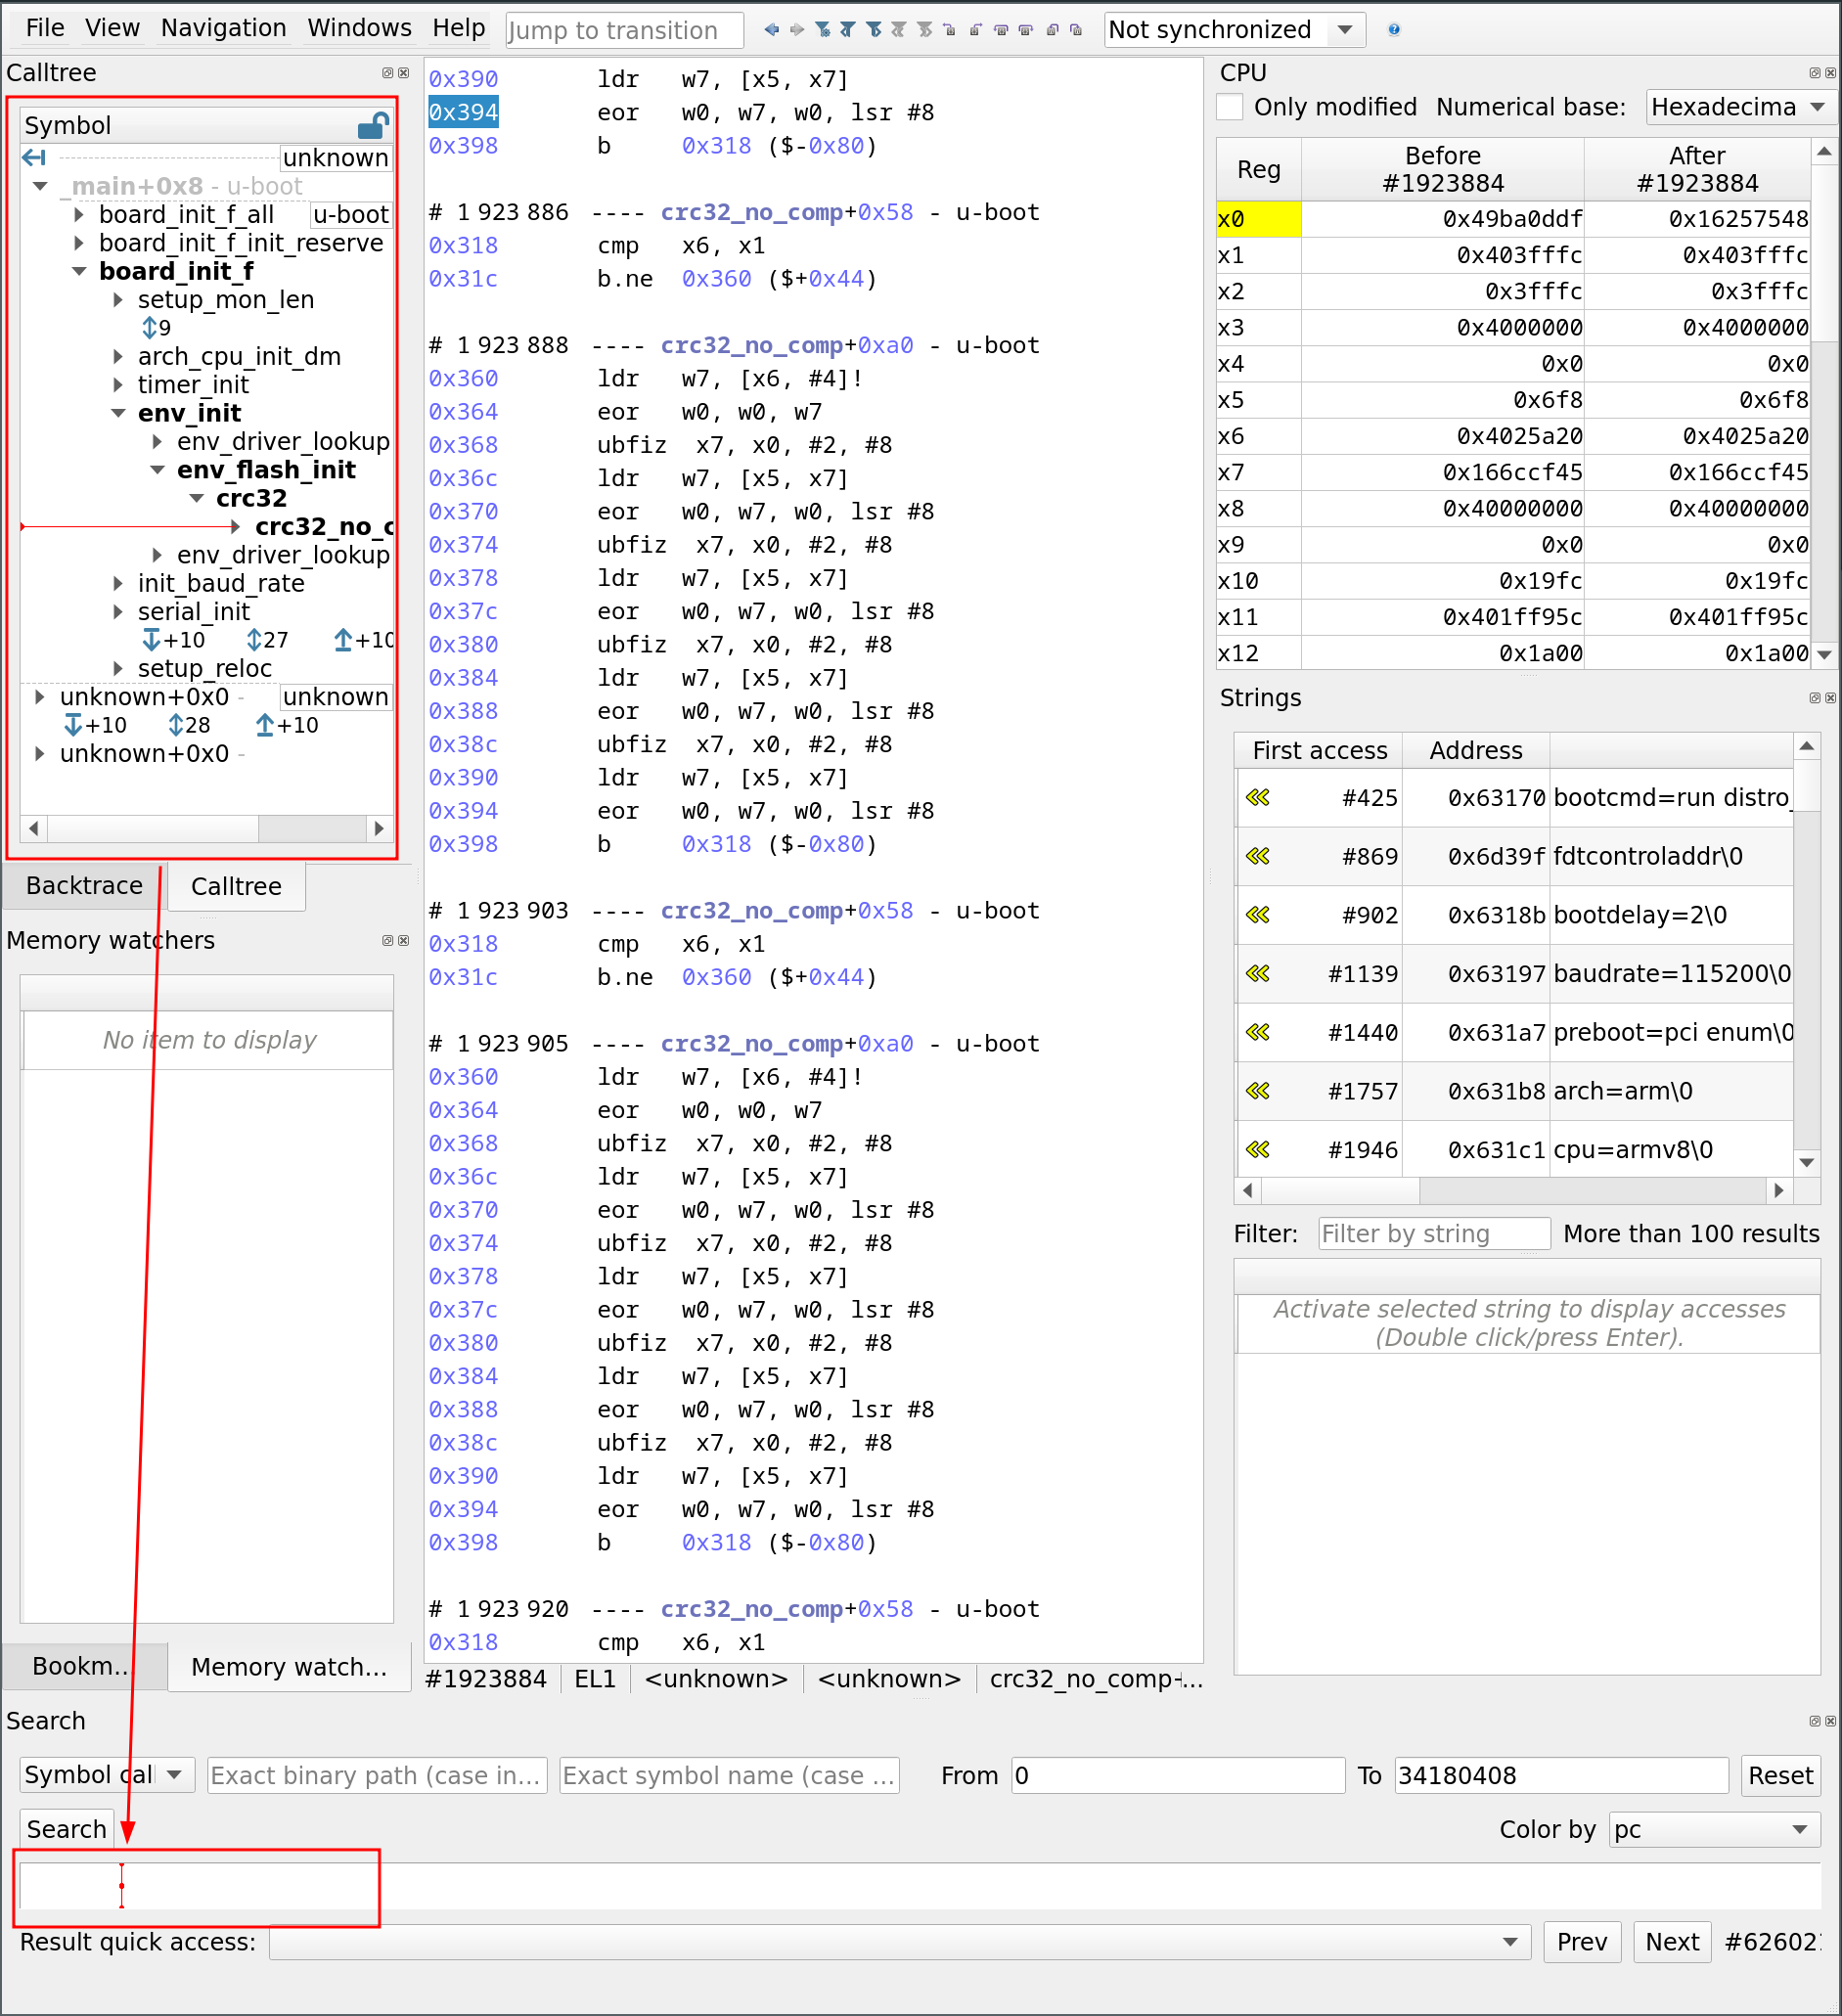
It's time to check whether we can pinpoint where the buffer overflow is triggered:
- We use the search bar to locate the nfs_readlink_reply function
- By clicking on the result, the call tree panel is updated, showing the different functions called by nfs_readlink_reply
- The vulnerability is triggered in the second memcpy
- When selecting it, we can observe the different parameters passed via registers, notably, the length in register x2 is set to 0x900.
- By clicking on x1 (which is the source pointer), we can inspect the data being copied, and we indeed see our buffer filled with 0xAA…AA.
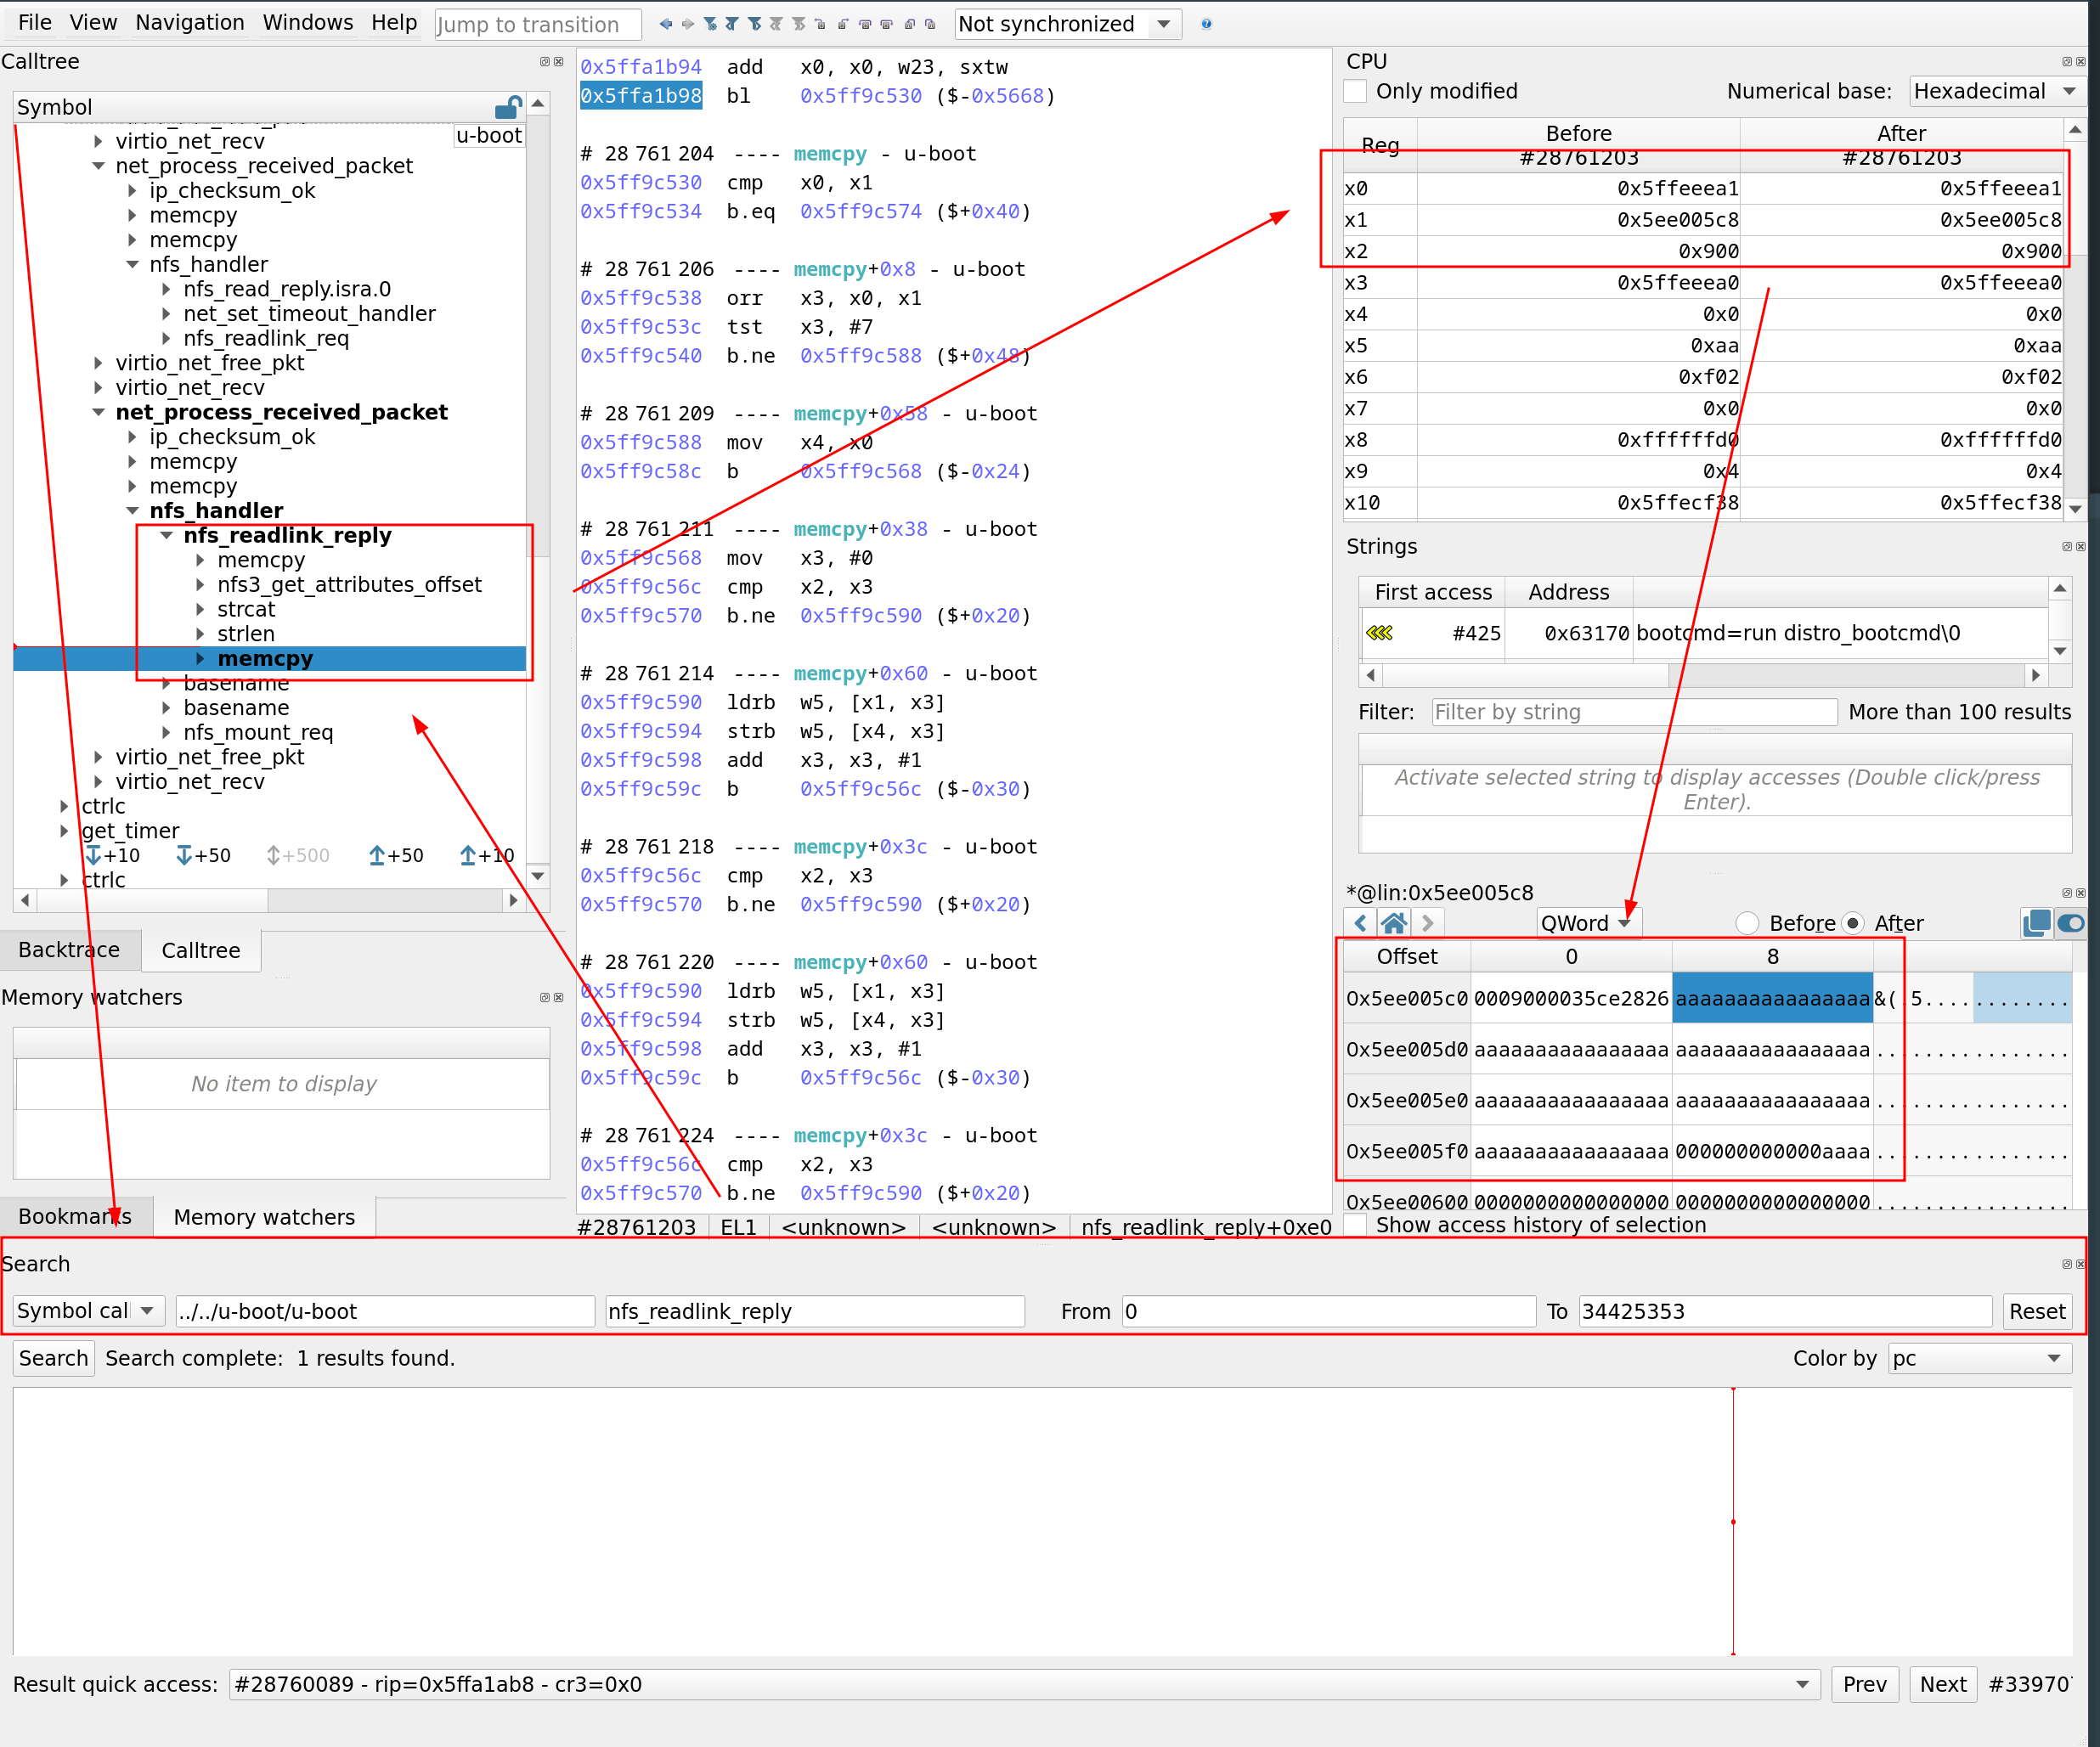
Success! The buffer overflow occurred exactly as planned, and we generated a TTA trace with QEMU without issue.
Conclusion
At first glance, performing Time Travel Analysis on an IoT target using QEMU emulation might seem overly complex—mainly because IoT devices often rely on hardware peripherals that aren’t emulated, or partially. That assumption is reasonable but not always true.
In some cases, the target firmware can be compiled specifically for QEMU, allowing for full software emulation without requiring real hardware. If the vulnerability in question is unrelated to hardware-specific behavior, QEMU becomes a very effective and reliable analysis platform.
We demonstrated this with the CVE-2019-14192, a buffer overflow in the U-Boot bootloader triggered during NFS communication. We successfully emulated U-Boot, triggered the vulnerability, and generated a TTA trace effortlessly.
In a next post, we’ll explore how to approach cases where the target firmware depends on hardware that QEMU does not emulate.