
ALL-IN-ONE PLATFORM
esDynamic
Manage your attack workflows in a powerful and collaborative platform.
Expertise Modules
Executable catalog of attacks and techniques.
Infrastructure
Integrate your lab equipment and remotely manage your bench.
Lab equipments
Upgrade your lab with the latest hardware technologies.


PHYSICAL ATTACKS
Side Channel Attacks
Evaluate cryptography algorithms from data acquitition to result visualisation.
Fault Injection Attacks
Laser, Electromagnetic or Glitch to exploit a physical disruption.
Security Failure Analysis
Explore photoemission and thermal laser stimulation techniques.


EXPERTISE SERVICES
Evaluation Lab
Our team is ready to provide expert analysis of your hardware.
Starter Kits
Build know-how via built-in use cases developed on modern chips.
Cybersecurity Training
Grow expertise with hands-on training modules guided by a coach.


ALL-IN-ONE PLATFORM
esReverse
Static, dynamic and stress testing in a powerful and collaborative platform.
Extension: Intel x86, x64
Dynamic analyses for x86/x64 binaries with dedicated emulation frameworks.
Extension: ARM 32, 64
Dynamic analyses for ARM binaries with dedicated emulation frameworks.
DIFFERENT USAGES
Penetration Testing
Identify and exploit system vulnerabilities in a single platform.
Vulnerability Research
Uncover and address security gaps faster and more efficiently.
Malevolent Code Analysis
Effectively detect and neutralise harmful software.
Digital Forensics
Collaboratively analyse data to ensure thorough investigation.


EXPERTISE SERVICES
Software Assessment
Our team is ready to provide expert analysis of your binary code.
Cybersecurity training
Grow expertise with hands-on training modules guided by a coach.
INDUSTRIES
Semiconductor
Security Labs
Governmental agencies
Academics

ABOUT US
Why eShard?
Our team
Careers


FOLLOW US
Linkedin
Twitter
Youtube
Gitlab
Github


MCUBoot Under (good) Pressure | Part 1: Walk Around the Code


We start, with this post, a series about security aspects of the bootloader MCUBoot, in particular focused on the use of code emulation in the context of fault injection. In this post we bring, to those not familiar with MCUBoot, the elements to understand the purpose of this software, how it works. Focusing on the application code authentication at the startup, we will initiate the background for the security assessment using emulation developed in the second post of this series. We will close this post with some attack scenarios and the different approaches to break the code authentication.
MCUBoot
![]()
MCUBoot is an open source project with the intent to define a so-called "secure bootloader" for 32 bits microcontrollers. As a bootloader, it is the first software executed by the device that offers security services. Among them it provides standardized secure methods and data infrastructure to load, upgrade software or simply start an authenticated software. It is operated by major names of the embedded system industry as ARM, ST, Infineon or Nordic Semiconductor. MCUBoot is integrated in the ARM Trusted Firmware-M which is the reference implementation of the Platform Security Architecture (PSA) IoT Security Framework.
![]()
Secure loading, starting or updating of the application code are the main security objectives of MCUBoot. From this claim, several assets are identified:
- The MCUBoot code itself, which storage or execution must not be altered.
- The application code, which storage or execution must not be altered in the same way.
- The Root Public Key value, which enables checking the application code, that must not be tampered with.
The potential threats targeting MCUBoot are:
- The modification of the MCUBoot code,
- The modification of the application code,
- Rollback the application code to an older version.
To protect its assets against these threats, MCUBoot implements these security functions:
- Its code is stored in ROM to prevent alteration.
- The authenticity is based on the use of digital signatures and hash functions, to guarantee integrity and genuine aspects for application code at startup.
- It includes a mechanism for preventing rollback attacks against the application code.
Code Authentication
Application code is organized in a structure called image. This image is organized in items as depicted on Figure 1. Hereafter, we will restrict our image description to elements that take part of the authentication mechanism:
- The Header including, among all, the Code size and the Code version number,
- The Code of the application in native binary with a starting address 0x00000400,
- Sections with a "tag-length-value" structures
- The hash computed on the concatenation of the Header and the Code based on the SHA-256 hash function.
- The Public Key linked to the MCUBoot instance, or the hash of this Public Key.
- The Signature applied on the concatenation of the Header and the Code computed with the private key corresponding to the public key present in the above section. Several types of algorithm are supported: RSA PSS, PCKS#2 or ECDSA.
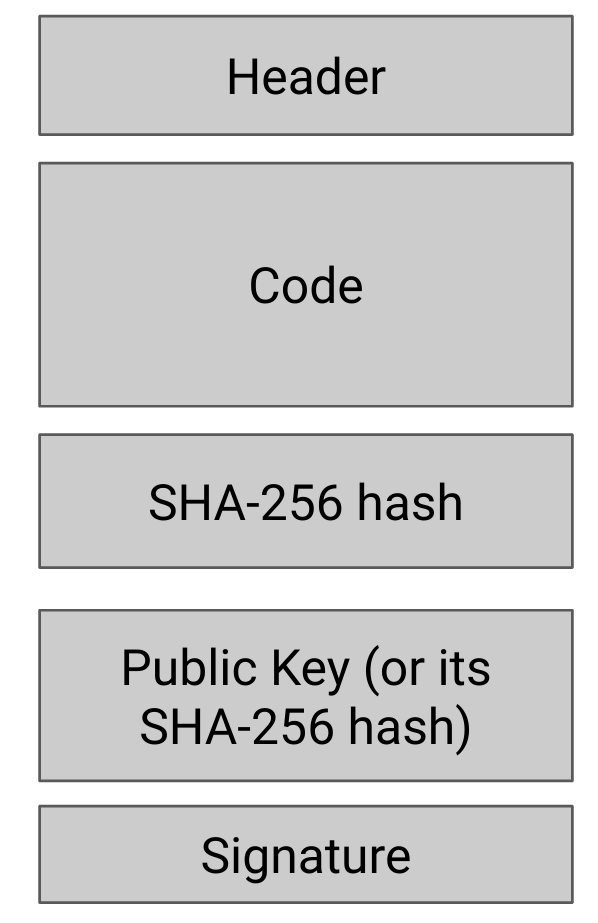
Figure 1 - Application code image
Let us follow the MCUBoot code to understand how the authentication of the application
code is driven. For this purpose, we use the version tagged v1.9.0. Each step will be explained
and linked to the corresponding source code with the canonical format filename:line_start-line_end.
We can find the main function in the bl2_main.c file. As we can expect, the code crosses several functions before reaching the function of interest bootutil_img_validate where the image format is checked. The call stack is the following:
- main
- boot_go_for_image_id
- context_boot_go
- boot_validate_slot
- boot_image check
- bootutil_img_validate
- boot_image check
- boot_validate_slot
- context_boot_go
- boot_go_for_image_id
The bootutil_img_validate function loops on each item of the image and applies a validation process. At first, the header and the code are retrieved, and the bootutil_img_hash (image_validate.c:366-374) computes the SHA-256 hash of these two sections.
Then, it retrieves the corresponding hash section having the expected tag and the expected length (image_validate.c:393-405) and it checks that the computed hash value is consistent with the value loaded from the hash section (image_validate.c:407-410).
Next, MCUBoot reads the Public Key from the corresponding image section (image_validate.c:433-444), it computes its SHA-256 hash, and it compares the obtained value with the one embedded in its own data section with bootutil_find_key function (image_validate.c:445-445).
Ultimately, MCUBoot reads the signature section, and verifies it using the hash computed formerly on the header and the code (image_validate.c:465-466). If a RSA PSS PCKS#v2.1 signature is used, mbedtls_rsa_public performs the decryption with the public (image_rsa.c:187-187). Then, bootutil_cmp_rsasig checks the decrypted signature values (image_rsa.c:316-316).
Once the verification process is over, the function boot_go_for_image_id ends and returns a value reflecting the result of the image authentication. Back to the main function this final result is analyzed. In case of a failure, the execution will be stopped (bl2_main.c:154-158).
We have seen above the main mechanisms used by MCUBoot to ensure "secure" boot with legitimate application code. To summarize, the application code is instantiated through an image with a structure used by MCUBoot to verify integrity of both the code and some metadata, like the code version, the code length, and guarantee authenticity via a public key cryptographic signature.
If I was a Hacker ...
Wouldn’t be cool if I could execute arbitrary code. Let me suppose that:
- I have physical access to the chip embedding MCUBoot,
- Since MCUBoot is open-source, I have access to all available information on MCUBoot so the above described authentication or the image format,
- I also have tools to put my own code into the FLASH used by MCUBoot for the code image loading.
Obviously, I do not have the secret key necessary to sign the code and make a legitimate image, but I will use my favorite fault injection bench to induce fault during MCUBoot execution and try to get my code accepted.
Two attack scenarios come immediately to my mind:
- Scenario 1 - I generate my own signature key pair compliant to one of the accepted signature standards, and prepare an image with my code, my own public key, and the signature computed with my own private key.
- Scenario 2 - I take a genuine code image, I replace the code with my own code keeping the same length and update the SHA-256 section value.
In the first scenario, I expect MCUBoot to detect that the public key is not the genuine one at the public key verification step. According to the above code description, the find_key function should fail... bad luck 😕. Happily, for us, MCUBoot uses the provided Public Key inside the image. Therefore, tampering with the find_key function would result in acceptance of my code.
In the second scenario, my hack attempt should be detected by the signature verification because the hash is not the one used for the signature 🤔. In this case, the function bootutil_cmp_rsasig will return a failure status, and I can try to fault this status to force acceptance of my code... The way to exploit this vulnerability is not straightforward without going into the code details, let us put this aside we will come back on it in the next posts.
Faulting with a hardware bench
As I told you, I am familiar with fault injection, indeed at eShard we practice this hardware attack technique with different means: LASER, Glitch or Electro-Magnetic. With these fault injection benches, we induce perturbation during code execution of a targeted device to turn this into something exploitable, sometimes a cryptographic secret key, but also sometimes to turn a test result...
But let me tell you some advantages, and drawbacks of this approach:
-
Advantages
- We need to characterize the hardware target. It means that we have identified, and eventually understood, the different effects that the injected disturbance have on the targeted device from the software standpoint (for instance instruction skip, zeroize register, flag update, ...). Each apprehend model is named a fault model, for instance a bit flip model modifies a single bit from 0 to 1 and vice versa. If the target has already been characterized, a flaw exploitation could be quick.
- The results are obtained on the final product, and are directly exploitable.
- The exploitable fault models are known and validated. This means that parameters to obtain a given fault are mastered.
-
Drawbacks
- Requires an attack bench, which in turn, could be more or less expensive. A suitable software suite to drive all the equipments and interpret the results are also necessary.
- Deep knowledge in physical attack and cryptanalysis is needed.
- The elapsed time is usually high. Target and attack bench setup, sensitive area identification, and attack exploitation can be tedious.
- Target samples might be destroyed during the fault campaign.
- Once a flaw found, it might be difficult to understand its origin to define a countermeasure:
- Which piece of code is involved?
- How to mitigate the flaw? Checking the efficiency of the countermeasure requires launching a new fault injection campaign.
The lack of equipment, knowledge or time make this approach too heavy for a lot of people. To tackle all these issues, with the growing computation power available on our desk today, a new approach emerged: leverage the software emulation of the target to make simulated hardware attacks.
Faulting in Simulation
Simulation-based software is another approach to assess a target against fault injection attacks. A part, or the whole of the target code can be emulated, and a disturbance injected during its execution. The emulation can take the binary code as an input. Different elements of the chip can be emulated, and therefore faulted: instruction, registers, memory. In another way, the emulation can be performed at a lower level with a hardware description language (HDL), such as Verilog and VHDL. From the hardware description, we should access a finer emulation of the target behavior, even though it is more complex to deploy. But, most of the chip HDL is not publicly available.
Seems to be promising, no? Let me draw the list of the advantages and the drawbacks of this approach:
-
Advantages
- No more need of the physical target.
- No more sample destruction, just restart emulation.
- Cheaper required hardware equipment (a simple PC is enough) likewise the software suite.
- Required knowledge is limited to hardware and software areas to define the fault model and lead to perturbations.
- Multiple software targets can be launched in parallel, it enables optimizing the elapsed time.
- If the emulated code behavior is deterministic, the results are perfectly reproducible.
- Once a flaw identified:
- Understanding its origin is easier will code emulation and debugging.
- The code analysis enables us to check if this flaw is present in other places.
- It is easier to implement and assess the strength of a countermeasure.
-
Drawbacks
- The obtained results depend on the fault model, and so may, or may not, be realistic. Some fault models depend on the underlying hardware, and might be difficult to emulate.
- Ultimately, emulation enables to prequalify a product from its code, without needing physical equipment. This is not a guarantee that once installed on the physical device this code will be fault proof, but for sure, the probability that an attacker can break it with physical fault injection means is significantly lower thanks to the strengthening process based on simulation approach.
In the next post, we will show how to emulate MCUBoot with esFirmware, and which strategies can be used to attack it with simulated faults.
Thanks to Pylou for proofreading this article.